
If you are looking for a cardio
workout that offers a big calorie payoff with minimal impact on your
hips, knees and ankles, indoor cycling is a great option that delivers
on both fronts. With a little bit of know-how you can ensure that an
indoor cycling class is the most challenging workout of your week—and
also the most enjoyable. Below are some tips to make sure you are never
“spinning your wheels.” If you are a new rider, these bike fit tips will
help set you up for success, and if you are getting back on the bike
after some time away, here is a refresher to help maximize your time
in—and out—of the saddle.
The purpose of this adjustment is to put you in a comfortable and powerful riding position, where your leg is lengthened as much as possible when the pedal is at the floor, but you are comfortable in the saddle and feel you can easily reach this bottom-most position. Stand on the floor to one side of the bike, next to the saddle and facing the handlebars. Locate the top of your pelvis by feeling with your fingers for your hip bone or lift your thigh until it is level with the floor and notice where the crease of your hip folds (it will be easiest to use the hip/leg closest to the bike). Adjust the saddle up or down until it is approximately level with this place.
This saddle adjustment is designed to allow you to align your knee in “neutral” over the pedal, much like when you are correctly performing a squat or a lunge and your knee tracks over your foot, but not beyond your toes. The center of this adjustment fits the average rider, and on some brands of indoor cycling bikes this will mean an accurate fit for more than 80 percent of exercisers. It’s a great place to begin when you are setting up your bike without the help of an instructor. Simply loosen the adjustment that moves the saddle forward and backward and notice how far it moves in both directions. Position the saddle in the middle of this space.
Adjust the handlebars up or down and, depending on the brand of indoor cycling bike, forward and backward, so that you can reach them comfortably while keeping a tall back, an open chest, relaxed shoulders and a small bend in your elbows. On most bikes there are several places to put your hands on the handlebars. Rest your hands on the spot that feels most comfortable to you, while keeping your fingers relaxed (no gripping!) and your wrists long from elbow to fingertips. You should expect that your favorite place for your hands will vary depending on whether you are seated or standing up.
Get on the bike and place your foot in the tennis-shoe cage. Position the ball of your foot in the center of the pedal, which will help you maximize each pedal stroke with the most amount of power. Now tighten up the strap. Take a few pedal strokes both in and out of the saddle to test how your new bike adjustments feel. Change anything that isn’t quite right now before living with it for an entire workout and tighten down all the adjustment knobs before beginning your workout. When you are seated, remember to sit toward the back of the saddle where the most cushioning is and point your tailbone more toward the wall behind rather than toward the floor beneath you. This will make for a lighter feeling in your seat and allow you to keep your upper-body posture tall and tension free as described above.
Source Julz Arney Julz Arney embodies all-out energy and motivation! As an ACE-certified Group Fitness Instructor with 22 years in the fitness business
Bike Fit
If you’ve ever tried to go for a run in shoes that are too big or too
small, you can appreciate the importance of having equipment that fits.
While you can still do the activity with an improper fit, it’s not
comfortable, efficient or enjoyable, and over time can lead to injury.
The same is true with your indoor cycling bike. Fortunately, it’s easy
to get a safe and comfortable Quick Fit* in just four simple steps that
will see you through your first few classes.
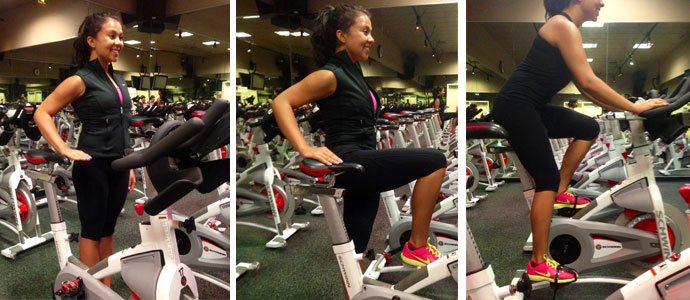
Step One: Saddle Height
The purpose of this adjustment is to put you in a comfortable and powerful riding position, where your leg is lengthened as much as possible when the pedal is at the floor, but you are comfortable in the saddle and feel you can easily reach this bottom-most position. Stand on the floor to one side of the bike, next to the saddle and facing the handlebars. Locate the top of your pelvis by feeling with your fingers for your hip bone or lift your thigh until it is level with the floor and notice where the crease of your hip folds (it will be easiest to use the hip/leg closest to the bike). Adjust the saddle up or down until it is approximately level with this place.
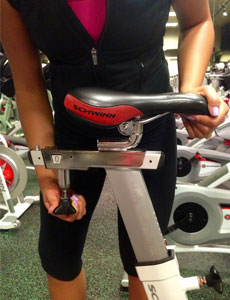
Step Two: Saddle Forward/Backward
This saddle adjustment is designed to allow you to align your knee in “neutral” over the pedal, much like when you are correctly performing a squat or a lunge and your knee tracks over your foot, but not beyond your toes. The center of this adjustment fits the average rider, and on some brands of indoor cycling bikes this will mean an accurate fit for more than 80 percent of exercisers. It’s a great place to begin when you are setting up your bike without the help of an instructor. Simply loosen the adjustment that moves the saddle forward and backward and notice how far it moves in both directions. Position the saddle in the middle of this space.
Step Three: Handle Bars
Adjust the handlebars up or down and, depending on the brand of indoor cycling bike, forward and backward, so that you can reach them comfortably while keeping a tall back, an open chest, relaxed shoulders and a small bend in your elbows. On most bikes there are several places to put your hands on the handlebars. Rest your hands on the spot that feels most comfortable to you, while keeping your fingers relaxed (no gripping!) and your wrists long from elbow to fingertips. You should expect that your favorite place for your hands will vary depending on whether you are seated or standing up.
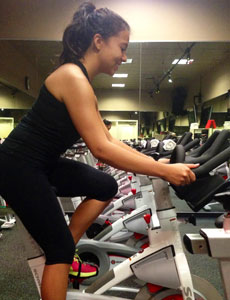
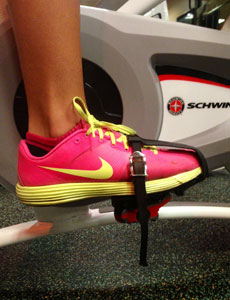
Step Four: Foot Placement & Test Drive
Get on the bike and place your foot in the tennis-shoe cage. Position the ball of your foot in the center of the pedal, which will help you maximize each pedal stroke with the most amount of power. Now tighten up the strap. Take a few pedal strokes both in and out of the saddle to test how your new bike adjustments feel. Change anything that isn’t quite right now before living with it for an entire workout and tighten down all the adjustment knobs before beginning your workout. When you are seated, remember to sit toward the back of the saddle where the most cushioning is and point your tailbone more toward the wall behind rather than toward the floor beneath you. This will make for a lighter feeling in your seat and allow you to keep your upper-body posture tall and tension free as described above.
Source Julz Arney Julz Arney embodies all-out energy and motivation! As an ACE-certified Group Fitness Instructor with 22 years in the fitness business
No comments:
Post a Comment