
Saturday 29 November 2014
Joe Manganiello's Fitness Tips
In addition to winning both popular and critical praise as the star of
True Blood and Magic Mike, Joe Manganiello has become known around the
world for his incredible physique. Now, from the man that director
Steven Soderbergh called “walking CGI,” comes the cutting-edge guide to
achieving the perfect body and raising your overall quality of life. Check Out Joe's Fitness Tips
CrossFit Terminology
CrossFit Acronyms and Abbreviations
AMRAP: As Many Reps (sometimes Rounds)as Possible

ATG: Ass to Grass
BP: Bench press
BS: Back squat
BW (or BWT): Body weight
CFT:CrossFit Total – consisting of max squat, press, and deadlift.
CFSB: CrossFit Strength Bias. A program developed by Jeff Martin and Darrell White
CFWU:CrossFit Warm-up
CLN: Clean
C&J: Clean and jerk
C2: Concept II rowing machine
DL: Deadlift
FS: Front squat
GHR(D): Glute ham raise (developer). Posterior chain exercise, like a back extension. Also, the device that allows for the proper performance of a GHR.
GHR(D) Situp: Situp done on the GHR(D) bench.
GPP: General physical preparedness, aka “fitness.”
GTG: Grease the Groove, a protocol of doing many sub-maximal sets of an exercise throughtout the day
H2H: Hand to hand; refers to Jeff Martone’s kettlebell “juggling” techniques (or to combat).
HSPU: Hand stand push up. Kick up into a handstand (use wall for balance, if needed) bend arms until nose touches floor and push back up.
HSQ: Hang squat (clean or snatch). Start with bar “at the hang,” about knee height. Initiate pull. As the bar rises drop into a full squat and catch the bar in the racked position. From there, rise to a standing position
IF: Intermittent Fasting
KB: Kettlebell
MEBBMaximum Effort Black box, term coined by Mike Rutherford. Search the forum for it. Originally laid out in one of the early Performance Menu issues.
KTE: Knees to elbows. Similar to TTBs described below.
MetCon: Metabolic Conditioning workout
MP: Military press
MU: Muscle ups. Hanging from rings you do a combination pull-up and dip so you end in an upright support.
OHS: Overhead squat. Full-depth squat performed while arms are locked out in a wide grip press position above (and usually behind) the head.
PC: Power clean
Pd: Pood, weight measure for kettlebells
PR: Personal record
PP: Push press
PSN: Power snatch
PU: Pull-ups, possibly push ups depending on the context
Rep: Repetition. One performance of an exercise.
Rx’d; as Rx’d: As prescribed; as written. WOD done without any adjustments.
RM: Repetition maximum. Your 1RM is your max lift for one rep. Your 10 RM is the most you can lift 10 times.
SDHP: Sumo deadlift high pull (see exercise section)
Set: A number of repetitions. e.g., 3 sets of 10 reps, often seen as 3×10, means do 10 reps, rest, repeat, rest, repeat.
SPP: Specific physical preparednesss, aka skill training.
SN: Snatch
SQ: Squat
SS: Starting Strength; Mark Rippetoe’s great book on strength training basics.
Subbed: Substituted. The CORRECT use of “subbed,” as in “substituted,” is, “I subbed an exercise I can do for one I can’t,” For example,if you can’t do HSPU, you subbed regular pushups.
TGU: Turkish get-up (See exercise section)
TTB: Toes to bar. Hang from bar. Bending only at waist raise your toes to touch the bar, slowly lower them and repeat.
WO, sometimes W/O: Workout
WOD: Workout of the day

Thursday 27 November 2014
TRX Cardio Strength Workout
The TRX, one of the most popular, universal and easy to use exercise
tools in the fitness industry today. The TRX is one of the most
versatile and mobile devices designed to give you an effective and
challenging body weight workout. If you have access to a TRX then here
is a great video showcasing advanced TRX exercises and some fantastic
metabolic circuits. The idea of the metabolic circuits is to get your
heart rate, burn a bunch of calories and build strength as you are
sucking wind working with the negative rest. A great way to amp up your
workout, burn more fat and get your body moving.
Wednesday 26 November 2014
Ice Baths- Giving Muscle soreness the cold shoulder?
What is the current thinking on Ice Baths?
Success in sports depends on an athlete’s ability to perform functional movements, such as running, jumping or changing direction, to a high level on a daily basis. However, the fatiguing effect of high intensity competition and training experienced by elite athletes can reduce the quality of performance.But are they really effective? And what is the correct protocol? We take a look at the research behind the practice.

Reducing Muscle Soreness
One of the potential benefits of CWI is the reduction in muscle soreness associated with intense exercise, otherwise known as delayed onset muscle soreness (DOMS).There is now a vast body of research which supports the use of CWI following intense exercise to reduce DOMS (1, 3, 6, 10, 11, 17, 18, 19, 20,), with benefits including reduced pain at rest, reduced pain on stretch and increased active range of motion.
Several mechanisms have been suggested to be responsible for this reduced soreness including:
1) Reduced swelling due to hydrostatic pressure of water (20)
2) Reduced swelling due to constriction of blood vessels at low temperature (6)
3) Reduced nerve conduction velocity due to cold temperature, resulting in increased pain tolerance (1)
It is not known for certain which of the mechanisms play the biggest role in relieving soreness.
However, a recent study (9) comparing different CWI strategies has found that water immersion at 6°C was more effective than both water immersion at 10°C and contrast water immersion alternating between 10°C and 38°C. This would suggest that the cold temperature plays a more important role than the water immersion itself.
This benefit may only exist with trained athletes, and that those new to exercise or performing a new training regime will not see a reduction in muscle soreness.
Recovery of Performance
Despite the benefits of CWI for reducing muscle soreness, the effects on recovery of physical performance are less clear. Numerous studies have examined the effects of CWI on a variety of performance related parameters; however the mixed results make it difficult to draw solid conclusions about its effectiveness.The table below indicates the discrepancies between studies:
Table 1. Details and results of studies investigating the effects CWI strategies on recovery of performance

Although the results are varied, some patterns do exist across the studies. For instance, the studies which retested performance on the same day seemed to find either no effect or a negative effect. This has been attributed to decreased nerve velocity and also restricted blood flow to the muscle (1, 8).
Whereas studies which tested between 24-48 hours later were more likely to find a positive result, suggesting that CWI could help recovery for next day performance. This could be due to a reduced perception of fatigue and/or a reduction in localised swelling which has been shown to reduce force generation (5).
These could be important implications for the use of CWI in sport. Sportsmen and women in sports involving several bouts of competition within one day such as multi-event Athletics or Rugby Sevens would be advised to abstain from CWI in between bouts.
On the other hand CWI may be beneficial for athletes competing on consecutive days such as Tennis, Cycling or Tournament Football.
Due to the varied nature of the results however, there is no ‘best practice’ which can be advised regarding the use of CWI and so athletes should use with caution on an individualised basis as part of their recovery strategy.
Reducing Adaptation
Despite some research supporting the use of CWI for recovery of short term performance in sport, there are suggestions that long term use could actually have a negative impact on physical adaptation.Immersion in cold water has been shown to illicit an increase in the stress hormones cortisol and norepinephrine for up to 60minutes post immersion (4). These hormones are catabolic in nature, meaning that they act to break down muscle tissue, which would reduce the body’s ability to adapt to training.
In addition, the reduction in swelling associated with CWI and relieving muscle soreness may also be detrimental to adaptation. MacIntyre and colleagues (13) suggested that:
“the inflammatory response may be responsible for initiating, amplifying, and/or resolving skeletal muscle injury”
They also present evidence of the role of white blood cells in the
inflammatory response, which would be significantly reduced during cold
water immersion due to the vasoconstriction of localised blood vessels.Conclusions
The role of cold water immersion in recovery from intense exercise is still unclear. There is strong evidence which suggests muscle soreness resulting from exercise can be reduced in trained athletes, and that this may have a positive effect on performance in the following days.However the long term effects of cold water immersion on the physical adaptation to exercise remain uncertain. With this in mind, cold water immersion following training should be limited.
Matt Durber
Futher reading:
- The recovery pyramid
1) Algafly, A.A., & George, K.P. (2007). The effect of cryotherapy on nerve conduction velocity, pain threshold and pain tolerance. British Journal of Sport Medicine, 41, 365-369.
2) Ascensao, A., Leite, M., Rebelo, A.N., Magalhaes, S. & Magalhaes, J. (2011). Effects of cold water immersion on the recovery of physical performance and muscle damage following a one-off soccer match. Journal of Sports Sciences, 29, 217-225.
3) Bailey, D.M., Erith, S.J., Griffin, P.J., Dowson, A., Brewer, D.S., Gant, N., & Williams, C. (2007). Influence of cold-water immersion on indices of muscle damage following prolonged intermittent shuttle running. Journal of Sports Sciences, 25, 1163-1170.
4) Bleakley, C.M. & Davison, G.W. (2010). What is the biochemical and physiological rationale for using cold-water immersion in sports recovery? A systematic review. British Journal of Sports Medicine, 44, 179-187.
5) Brophy-Williams, N., Landers, G. & Wallman, K. (2011). Effect of immediate and delayed cold water immersion after a high intensity exercise session on subsequent run performance. Journal of Sports Science and Medicine, 10, 665-670.
6) Cochrane, D.J. (2004). Alternating hot and cold water immersion for athlete recovery: A review. Physical Therapy in Sport, 5, 26-32.
7) Crampton, D., Donne, B., Egana, M. & Warmington, S.A. (2011). Sprint cycling performance Is maintained with short-term contrast water immersion. Medicine and Science in Sports and Exercise, 43, 2180-2188.
8) Crowe, M.J., O’Connor, D., & Rudd, D. (2007). Cold water recovery reduces anaerobic performance. International Journal of Sports Medicine, 28, 994-998.
9) University of Ulster (Pre-Publication). Post exercise recovery research.
10) Eston, R., & Peters, D. (1999). Effects of cold water immersion on the symptoms of exercise-induced muscle damage. Journal of Sports Science, 17, 231-238.
11) Goodall, S., & Howatson, G. (2008). The effects of cold water immersions on indices of muscle damage. Journal of Sports Science and Medicine, 7, 235-241.
12) Lane, K.N., & Wenger, H.A. (2004). Effect of selected recovery conditions on performance of repeated bouts of intermittent cycling separated by 24 hours. Journal of Strength and Conditioning Research, 18, 855-860.
13) MacIntyre, D.L., Reid, D.W. & McKenzie, D.C. (1995). Delayed Muscle Soreness. The inflammatory response to muscle injury and its clinical implications. Sports Medicine, 20, 24-40.
14) Patterson, S.M., Udermann, B.E., Doberstein, S.T., & Reinke, D.M. (2008). The effects of cold whirlpool on power, agility and range of motion. Journal of Sports Science and Medicine, 7, 387-394.
15) Rowsell, G.J., Coutts, A.J., Reaburn, P. & Hill-Haas, S. (2011). Effect of post-match cold-water immersion on subsequent match running performance in junior soccer players during tournament play. Journal of Sports Sciences, 29, 1-6.
16) Sellwood, K.L., Brukner, P., Williams, D., Nicol, A., & Hinman, R. (2007). Ice-water immersion and delayed onset muscle soreness: A randomised control trial. British Journal of Sports Medicine, 41, 392-397.
17) Skurvydas, A., Sipaviciene, S., Krutulyte, G., Gailiuniele, A., Stasiulis, A, Mamkus, G., & Stanislovaitis, A. (2006). Cooling of leg muscles affects dynamics of indirect indicators of skeletal muscle damage. Journal of Back and Musculoskeletal Rehabilitation, 19, 141-151.
18) Vaile, J.M., Gill, N.D., & Blazevich, A.J. (2007). The effect of contrast water therapy on symptoms of delayed onset muscle soreness. The Journal of Strength and Conditioning Research, 21, 697-702.
19) Vaile, J.M., Halson, S., Gill, N.D., & Dawson, B. (2008). Effect of hydrotherapy on recovery from fatigue. International Journal of Sports Medicine, 29, 539-544.
20) Wilcock, I.M., Cronin, J.B., & Hing, W.A. (2006). Physiological response to water immersion: A method for recovery? Sports Medicine, 36, 747-765.
Tuesday 25 November 2014
Why we need to add Supplements in our Daily Nutrition….
I used to be that person who believed wholeheartedly in only eating
“whole” foods. What does the term “whole” mean anyways? Well, it is
defined as a food that is processed and refined as little as possible.
So in essence this means all of your fresh fruits and vegetables, whole
grains, and lean meats. As a health nut, I honestly believed this was
the ONLY way to go, and some still do. It is simply a matter of opinion
and your beliefs. I still felt as if I was missing something because I
felt sluggish, tired, and had cravings all the time. I know I was eating
enough food and taking in all of the right nutrients (so I thought),
but what was I missing? Did you know that our fresh fruits and
vegetables are missing 80% of their nutrients!? WHAT!?? Even when we do
have good intentions of eating the right foods, we are still missing out
on all of this wonderful nutrition we are supposed to be getting. THAT
IS INSANE!!

There are quite a few reasons as to why our fruits and vegetables are so nutritionally bankrupt and other reasons why we need the supplementation from other sources….
1. Herbicides and pesticides are being thrown on our fruits and vegetables to kill all the bugs eating them. Here is the kicker, “kill”. So, this was made to get rid of these creatures, which sure, it does, but it also kills most of the nutrition. Should we really be consuming it?
2. Our foods today are highly processed and prepared in a way which again, destroys much of the nutritional value.
3. Depleted soils! When you have a diet high in fruits and vegetables, chances are you are getting them from a fairly natural source. The problem is most soils are used over and over again to grow fruits and vegetables. With each growth, the mineral content becomes insufficient.
 4. Skipping meals! In today’s society, it seems the norm has now become
to sleep in as late as we possibly can, then grab a poptart or a bagel
on our way out the door….OR we just skip breakfast all together and do
not eat until lunch time. These do not count as an entire meal because
they are not nutritionally dense and only leave you feeling hungry.
4. Skipping meals! In today’s society, it seems the norm has now become
to sleep in as late as we possibly can, then grab a poptart or a bagel
on our way out the door….OR we just skip breakfast all together and do
not eat until lunch time. These do not count as an entire meal because
they are not nutritionally dense and only leave you feeling hungry. 
5. STRESS is another big factor! We all live busy lives; constantly running from place to place leaving little time to eat or even think about getting proper nutrition into your body. Did you know that fueling your body with the right nutrition can help to normalize your bodies functions and help rid it of stress!?


These are the biggest factors that come to mind when thinking about supplementing in nutrition. Now, there are MANY supplement companies out there promising to be the very best and that they deliver everything you need, but what they don’t tell you about are all the artificial flavorings and chemicals poured into these supplements that are just as harmful to your body as not getting the nutrients at all. Like many of you, I was a HUGE skeptic of any type of supplement bought off the shelves or any of these fad meal replacement shake companies. I tried many protein powders, but all just left me feeling bloated and crappy.
What to look for in a supplement or meal replacement shake….
1. Soy free
2. Gluten free
3. No sucralose (Splenda) http://institutefornaturalhealing.com/2013/06/splenda-the-little-packet-of-death/
4. Non GMO
5. Where your shakes are being manufactured
6. Belief in the company producing the products
7. Natural ingredients
8. High quality ingredients
My choice of supplementation is Isagenix. Let me tell you, I have NEVER been a supplement person before. I had taken various protein powders before, but all they left me with was a sour stomach. I was strictly whole and organic foods, but as mentioned before, even that is not always enough. Isagenix protein is undenatured whey and comes from what I like to call “happy” cows in New Zealand. They are strictly grass fed and even fed and milked according to season. Because my body is getting the nourishment it needs, I am left feeling the way our bodies should, ENERGIZED AND HAPPY!!
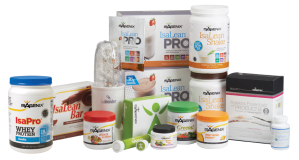
Want to know more about Isagenix Products Isagenix Online
There are quite a few reasons as to why our fruits and vegetables are so nutritionally bankrupt and other reasons why we need the supplementation from other sources….
1. Herbicides and pesticides are being thrown on our fruits and vegetables to kill all the bugs eating them. Here is the kicker, “kill”. So, this was made to get rid of these creatures, which sure, it does, but it also kills most of the nutrition. Should we really be consuming it?
2. Our foods today are highly processed and prepared in a way which again, destroys much of the nutritional value.
3. Depleted soils! When you have a diet high in fruits and vegetables, chances are you are getting them from a fairly natural source. The problem is most soils are used over and over again to grow fruits and vegetables. With each growth, the mineral content becomes insufficient.

5. STRESS is another big factor! We all live busy lives; constantly running from place to place leaving little time to eat or even think about getting proper nutrition into your body. Did you know that fueling your body with the right nutrition can help to normalize your bodies functions and help rid it of stress!?

These are the biggest factors that come to mind when thinking about supplementing in nutrition. Now, there are MANY supplement companies out there promising to be the very best and that they deliver everything you need, but what they don’t tell you about are all the artificial flavorings and chemicals poured into these supplements that are just as harmful to your body as not getting the nutrients at all. Like many of you, I was a HUGE skeptic of any type of supplement bought off the shelves or any of these fad meal replacement shake companies. I tried many protein powders, but all just left me feeling bloated and crappy.
What to look for in a supplement or meal replacement shake….
1. Soy free
2. Gluten free
3. No sucralose (Splenda) http://institutefornaturalhealing.com/2013/06/splenda-the-little-packet-of-death/
4. Non GMO
5. Where your shakes are being manufactured
6. Belief in the company producing the products
7. Natural ingredients
8. High quality ingredients
My choice of supplementation is Isagenix. Let me tell you, I have NEVER been a supplement person before. I had taken various protein powders before, but all they left me with was a sour stomach. I was strictly whole and organic foods, but as mentioned before, even that is not always enough. Isagenix protein is undenatured whey and comes from what I like to call “happy” cows in New Zealand. They are strictly grass fed and even fed and milked according to season. Because my body is getting the nourishment it needs, I am left feeling the way our bodies should, ENERGIZED AND HAPPY!!

Want to know more about Isagenix Products Isagenix Online
The Seven Habits of Highly Effective Crossfitters
The Seven Habits of Highly Effective Crossfitters
1. Be Proactive – Take responsibility for your life
Some things are not within your control but take control of those that are. Doing Crossfit on a regular basis requires guts, determination and a commitment. It is also an investment in your well-being, which transfers outside of the gym. Turn up, push yourself and be positive.
2. Begin with the end in Mind – Define your mission and goals
Everyone who does Crossfit has strength and weaknesses, some more so than others. Whilst it is great to nurture your strengths, the greatest gains often come from addressing your weaknesses. This is one of the major benefits of Crossfit over a traditional gym. The WoDs are prescribed and scalable, so unless you ‘WoD pick’, you get an all round experience. Set yourself a challenge and work for it.
3. Put First things First – Prioritise and do the most important things first
Get the balance right. It is easy to become obsessed with Crossfit but it needs a balance against other activities – particularly if you have a family. Don’t be in a rush to attend every session and do listen to your body. A good diet, adequate rest and sleep are crucial to continuing to make gains.
4. Think Win-Win – Have an everyone can win attitude
Perhaps the greatest shock to someone who attends Crossfit is that it is often the person who finishes last who gets the most cheers. The people you train with quickly become friends. Egos are rare and the encouragement you give to others is readily reciprocated. The only time you have to beat is your last time.
5. Seek first to understand, then to be understood
The coaching staff have a complex role to undertake – to teach, to encourage, to push and to support. The coaching aspect at Crossfit is one of its greatest attributes. The ‘syllabus’ is extensive so it helps to listen, to trust and to persevere. It takes years of practise to achieve competency, so don’t try and coach but give advice when needed – such as when someone is doing something which may be harmful.
6. Synergise – Work together to achieve more
Partner workouts are an opportunity to work together and plays to each other’s strengths. Team WoDs and competitions take this further. Take opportunities to socialise and do some extra events – like workshops. These are often the most fun.
7. Sharpen the Saw – Renew yourself regularly
There are always improvements to be made, so it is important to review your techniques and movements on a regular basis. The ‘tekkers’ sessions assist this, drilling good form and allowing the more experienced Crossfitter the opportunity to fine tune their techniques. There are always more efficient ways to do things and the opportunities to learn are always there.
NB – I don’t profess to being an effective Crossfitter but I thought it would be useful to articulate the Seven Habits as suggested by Sean Covey (and his late father, Stephen Covey) with a Crossfit bias, as a reminder of what I feel I should be doing.
Their books expand on the Seven Habits and I would recommend them, especially the Teenager book by Sean Covey.
Source http://kfullwood.wordpress.com
Monday 24 November 2014
Kipping Pull-Up
Banded Pull-ups: To Band or Not To Band?

Over the last two years, I’ve had the pleasure of visiting many different CrossFit boxes throughout the United States. Plus, I’ve been a solid member of three different CrossFit boxes. As a result, I’ve been able to experience many different coaching and programming styles in which each gym brought their own specialty to the table. However, I found something universal among most gyms: the banded kipping pull-up.
Kipping pull-ups are a high-skill exercise that requires coordination and strength to keep the shoulder supported under a dynamic load. This seems to be a major struggle for most novice and some intermediate CrossFitters. I know it was for me, especially coming from a bodybuilding background where strict isolated movements were most common. Whether it’s because of a lack of knowledge on how to properly teach the movement or the patience to do so, I’ve noticed that members get thrown on the bands almost immediately.
Being educated in human anatomy (I have a CPTS from Fitness Institute International and am ACSM certified) with a special interest/knowledge about the shoulder, I questioned this coaching style and whether banded pull-ups were actually affective and safe.
Recently, my fiance and I relocated a bit north of Fort Lauderdale to the Delray Beach area in Florida, and we became members of CrossFit Delray Beach. While finishing up a workout session one day, I started a conversation with Laura Canteri, one of Delray’s head coaches. Laura is a former collegiate athlete who is passionate about human performance and program design. Once she had completed her Master of Science in exercise physiology, she enrolled in James FitzGerald’s OPT (Optimum Performance Training) assessment and program design courses. After learning about her background in exercise science, assessment, program design and coaching, I was anxious to hear her opinion on the banded kipping pull-up.
“I can’t speak for every coach, but I believe bands do more harm than good in terms of an athlete’s development,” Laura said. It was a breath of fresh air to hear my concerns validated.
Laura and I discussed how the most challenging part of a pull-up is the initial pull, which requires scapula retraction and depression. Band tension is highest at the bottom of the movement, so the initial snap of the band causes you to bypass the most important part of the pull-up. Athletes who continue to use the band will never learn how to fully activate the muscles needed for a strict pull-up and, in turn, will never build true strength. Laura and I then went on to discuss the importance of strength and skill in the movement.
“Its important to improve strength and skill simultaneously in all movements,” Laura said. “However, I stress the importance of strength before skill for kipping pull-ups due to the nature of the shoulder joint. If someone is unable to perform a strict pull-up, they will not possess the strength to support their shoulder in a dynamic load such as the kipping pull-up.”
Because the shoulder is a shallow socket joint and the most mobile joint in the human body, it’s highly susceptible to chronic shoulder problems and/or injuries. I’m not suggesting the removal of bands from your gym altogether, but I challenge you, whether you’re a coach at a box or a member of one, to hold yourself to a higher standard. Teach your members the importance of building strength and activating muscles that support the joints before you put them under the stress of a ballistic movement such as the kip. Program exercises that teach scapula retraction and depression such as ring rows and, of course, strict pull-ups.
If you’re a member of a box that allows you to use bands, start practicing without them. Add in strict pull-ups on your own, and if you can’t do a strict pull-up, then do jumping pull-ups and try to hold yourself up to the bar as long as you can. I guarantee you will get stronger and be able to do a bodyweight pull-up on your own.
Being fit and healthy is what we all want to achieve. On that journey, we hope to stay injury-free.
Stay enlightened, my friends!
25 Must-Try Medicine Ball Exercises

Time to get schweddy with some balls! Medicine balls, that is. Available in varying sizes and weights (some up to 150 pounds!), these weighted spheres can help improve muscular power and sports performance . The balls can be thrown and caught (don’t try that with a dumbbell!) making for explosive medicine ball movements that can improve overall athletic ability .
Plus, they’re super old school. Hippocrates used sand-filled animal skin pouches to help patients recover from injuries almost 2,000 years ago (clearly he was on to something). When choosing a weight, pick a ball that’s heavy enough to slow the motion (slower than if you weren’t using any weight at all), but not so heavy that control, accuracy, or range of motion take a hit (or the poor guy next to you).
Reps and sets will depend on intensity and fitness levels, so for most of these moves, we recommend aiming for three sets of 10-20 reps with good form. For those more focused on power and speed performance, switch it up with 3-5 sets of 3-5 reps (applying max force and max speed into every repetition ). Of utmost importance: Be aware of your surroundings. These balls can be a weapon of sorts, so pay close attention to the people (and pricey equipment) around you. Alright then, let’s go balls to the wall.
Full Body

1. Rock and Roll Up: This one is a toughie at first to coordinate, but hits all the major muscle groups in one powerful move (byahh!). Lie down, back to the mat, with knees bent. Hold a medicine ball on the ground with arms fully extended overhead. Pull the knees into the chest, preparing to use the weight of the ball (and the strength of your core!) to help catapult you to a controlled squat position, then standing. Next, slowly lower back into a squat, and ease back to the floor, butt first before lying back down. Don’t get too comfy though: The goal is to rock and roll for 10-12 reps.
2. Lunge With Twist: Come on baby, let’s do the twist! Engage that core, standing hip width apart with shoulders relaxed. Holding a medicine ball a few inches in front of the chest, step forward into a lunge with the right leg. (Safety first! Keep the knee from sliding forward past the toes.) Get deep into that lunge, making sure the front thigh is parallel with the floor, then with extended arms, reach the medicine ball to the right, rotating the torso at the same time. Maintain the lunge and return to center. Come to standing, then lunge with the other leg (and rotate to the left this time). These can be done in place, or moving forward as walking lunges. Do the twist for 10-12 reps per side.
3. Lunge With Overhead Press: Stand with the feet together, holding a lightweight medicine ball in front of the chest in both hands. Lift the right foot off the floor, bending the knee, and hold this position for one count before stepping forward into a lunge. With the bodyweight shifting to the right leg, reach the medicine ball straight overhead (try to avoid pulling a matrix move). While still in the lunge, pull the ball back to the chest, and bring the front leg back to the starting position. Lunge for 10 reps per leg.
4. Squat Press and Throw: Heels grounded, come to a squat position (as if sitting in an invisible chair). Drive through the heels to jump, and throw the ball straight up as high as possible — then get the hell out of the way! (a quick step back should do the trick). Let the ball drop to the ground. Press it out for 10-15 reps.
5. Reverse Swing: This move could be as disastrous as throwing a bowling ball the wrong way, so read carefully. Stand with the feet hip-width apart. Hold a medicine ball directly in front of the chest, with the elbows pointing down toward the floor. Lower into a squat, keeping the back flat, and head facing forward. Reach the medicine ball back between the legs. Ready for the fun part? Explosively swing the ball up overhead to the point that it reaches behind the head and neck (just don’t throw it backward!). Keep the abs contracted as the ankles, knees, and hips extend. Bonus: Throw the ball to the ground (and watch out for your face!). Ball so hard for 10-12 reps.
Legs & Glutes

6. Reaching Romanian Deadlift: This one takes balance, and a little breathing room to fully extend. Stand on the right leg, with a medicine ball in both hands. Bend the right knee slightly, and hinge forward at the hips, extending the left leg straight back (and for an extra challenge, extending the arms overhead). Feel like a ninja? Check! The body should now form a straight line that’s perpendicular with the standing leg. Return the extended leg to the floor, and repeat for 10-12 reps, then switch legs.
7. Step Jump: Hold a medicine ball to the heart, and never let go (Jack), while straddling the middle of a low bench or step (make sure it’s sturdy!). Drop into a squat until the tush makes contact with the bench. Stand about six inches from a low bench or platform, and jump up onto it so the feet land in a natural, wide stance.. Carefully jump back down to the start position. Jump up for 10-12 reps.
8. Circle Squat: Stand holding a medicine ball at the right hip. Circle the ball overhead toward the left, while stepping out the left leg to into a squat (just like a sumo wrestler). Circle the ball all the way to the right side of the body, while still in the squat, then step the feet back together, and circle the ball back to the right. Repeat 8-10 times through, then switch directions.
9. Single-Leg Squat: Stand with feet hip-width apart, knees slightly bent. Lift the right foot off the ground and extend it forward. Hold a medicine ball in front of the bellybutton. Lower the body into a squat position, sitting back into an imaginary chair with the knees safely positioned over the feet. Return to start position, and switch legs. That’s one rep. Get your squat on for 10-12 more.
10. Single-Leg Butt Lift: We’re warning you, this one really puts on a show. Lie on your back and place the sole of the right foot onto the medicine ball. Thrust the hips to the sky (very Jane Fonda-esque) with the left leg straight in the air, with all your weight supported by the right foot and the shoulders. Hold for one count, then slowly return to the start position with the butt on the matt, and repeat for 10-12 reps on each side.
Chest and Back

11. Medicine Ball Push-Up: Drop down and get ballsy. Starting in a traditional push-up position, toes tucked under, place your palms on the medicine ball, and shift your bodyweight forward until in plank position. Keeping the core tight, and the head aligned with the spine, slowly lower the chest toward the ball (woof!) until it nearly touches, keeping the elbows pinned tightly at your sides. Finish the move by pressing upward through the arms until they’re fully extended. Need an adjustment? Pop the knees on the mat and push it real good for 10-12 reps.
12. Weighted Superman: Lie face down on the mat with arms stretched out in front, holding onto a lightweight medicine ball (try starting with 4-6 lbs). Slowly raise the arms and legs up as high as possible, engaging the back muscles. Hold the position at the top for a few counts, all the while pretending you have a cape around your neck. Lower the body back down to the mat and repeat for 12-15 reps.
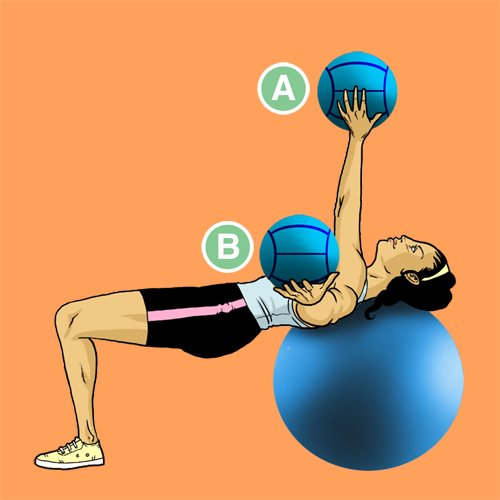
13. Lying Chest Toss: Since two balls are better than one, this move enlists a pair. Lie face up on a stability ball with the head and shoulder blades resting on the ball’s center, and knees bent at a 90-degree angle (the torso should be parallel to the floor). Keeping the neck in a neutral position (not straining forward or hanging back), hold a medicine ball with both hands just above the chest, with the elbows bent and pointed out to the sides. Push the ball out, in line with the chest, (like a classic chest pass) and toss it straight up toward the ceiling. Be extra careful not to toss the ball too hard. (Just remember: What goes up must come down.) Repeat for 12-15 reps.
14. Rolling Push-Up: If 9th Grade phys ed is in the past, then you know what push-ups are all about. Adding in a medicine ball quickly morphs the upper body-blaster into an even more challenging move. Get into high-plank with a medicine ball under one hand, and lower the chest toward the floor to perform a push-up. Return to high-plank and roll the ball to the other hand. Roll out 8-10 reps, or as many as possible maintaining good form.
15. Wall Pass: Find the nearest med ball-safe wall (when in doubt, always ask the gym’s staff which areas are fair game). Stand about 3-4 feet in front of it, holding a lightweight medicine ball with both hands. Get into an athletic stance, with a slight bend in the knees, and the core engaged. Bring the ball to the chest, and firmly throw it at the wall (get that aggression out!), and catch the ball on its return. Your mission: Balls to the wall for 12-15 reps — without taking off another gym goer’s head.
Shoulders and Arms
18. Figure 8: This is totally like ribbon dancing, just probably not as graceful. Stand with feet about shoulder-width apart. Hold onto a medicine ball with both hands to one side of the head, with arms fully extended. Slowly move the medicine ball in a fluid, controlled motion, forming the figure 8. Repeat 8-10 reps through clockwise, then switch directions. This one can be deceivingly tiring, so try it with a lighter ball first.
19. Triceps Extension: Stand in a comfortable stance, or sit tall in a chair, with the core engaged. Hold a medicine ball in both hands with the arms extended overhead, inner arms grazing the ears (resist the urge to lurch the arms forward and make an elephant noise). Next, bend the elbows, lowering the ball behind the head until the arms form a 45-degree angle (or as far as feels comfortable). Squeeze the triceps to straighten the arms, bringing the ball back to the starting position. Pump out 12-15 reps.
20. Bicep Curl: Stand with feet shoulder-width apart, holding the med ball in both hands at the chest. Keeping the elbows close to the body, lower the ball toward the ground until the arms are fully extended. Then curl the ball back up to the chest. Lower the arms back to the starting position. Curl for 12-15 reps — just never at the squat rack.
Core
21. V-Up: How To: Lie flat on your back, legs extended (but try not to snooze on the mat). Reach the arms overhead—à la first thing in the morning stretch—with a medicine ball in both hands. Engage the core to lift the hands and feet simultaneously so the body forms a “V” position. At the top of the “V,” pass the ball from the hands to the feet. Squeeze the ball between your sneaks, and slowly lower the arms and legs back down to the floor. Return to the “V,” and pass the ball back to the hands. That’s one rep. Wipe the sweat from your brow. Repeat for 8-10 more.22. Overhead Slam: Stand with your feet shoulder-width apart, and knees slightly bent. Hold a medicine ball in both hands, and lift it overhead. Then bend at the hips (slightly hinging forward), careful not to arch the back, and slam the ball on the ground directly in front. Ask fellow gym-goers nicely if it’s OK to slam on. And don’t slam toooo hard (control is key). Retrieve the ball and keep at it for 10-12 reps.
23. Straight-Leg Sit-Ups: Ready to take the standard sit-ups up a notch? Lie flat, back to the mat, with a medicine ball in both hands. Extend the arms straight so the ball is directly above the hips. While keeping the legs together, raise them directly over the hips to the ceiling (so the body forms a giant “L”). With control, return to the start position and bust out 12-15 reps.
24. Hay Bailer: Kneel on the right knee, (with the left foot back, toes curled under) to form a 90-degree angle. Hold a medicine ball in both hands close to the body while keeping the torso tight, and perpendicular to the floor. Bring the medicine ball toward the right hip, while keeping the rest of the body forward, then transfer it diagonally up and across the body (Think: John Travolta in Saturday Night Fever). Hold this position for one count before returning to the start position. Repeat the movement in the opposite direction with the right foot forward. (Pro tip: The more the arms are extended, the harder the move is). Bail that hay for 12-15 reps.
25. Toe Touch: Touching your toes just got even trickier. Lie on the floor, holding a medicine ball in both hands. Extend the arms overhead, with shoulders back and down to the mat. While keeping the legs together, raise them directly over the hips to the ceiling (so the body forms a giant “L”). Next, bring the ball overhead (keep the neck in a neutral position throughout), and reach it as close to the toes as possible. Crunch the upper body to the toes for 12-15 reps.
Source http://greatist.com/fitness/25-must-try-medicine-ball-exercises
Sunday 23 November 2014
Spin Class 101

I've found that the best classes are the ones with an instructor whose
style you like the best and who plays the best music. If you've never
taken a spin class, just arrive a few minutes early and
talk to the instructor. They will help you adjust the bike to your
height and explain how to dial up or down the intensity. You can go at
your own pace though and work as hard as you feel comfortable.
Spinning is such an awesome workout and not just for your legs. Some
teachers have the participants do push-up motions on the handlebars,
etc. Unless you sneak out of the class early, you are pretty much
guaranteed a good 45-minute workout. Being in a class definitely helps
you keep going, as opposed to when you're on your own, you might have
quit earlier. I've read that spin class burns between 400-600 calories
and, depending on how fast you pedal, a 40 minute class is the
equivalent to 15-20 road miles.
My word of caution is definitely bring a large bottle of water with you
to class- and a towel. It gets pretty sweaty- in a good way! Oh, and
you might be pretty sore in the "crotch region" after the first couple
of classes- sorry, no real way to avoid that, but you can buy padded
shorts or a seat pad that actually does help. I've used one before, but
then forgot to take it off the bike seat/saddle and left it behind. You
don't need special shoes, regular tennis shoes work fine, but if you
get to liking the class so much and you're doing it often, they do make
special shoes that clip into the pedals as opposed to your regular
tennis shoe being strapped to the pedal.
One more thing, about group classes in general- if you find one you like and start going regularly, you'll end up seeing the other "regulars" and it gets to become kind of a connection-sharing thing. You become friendly with the other members and get used to meeting up with them at class and that can be inspiring and fun to have a regular group of people to workout with. You never know who you'll meet- just sayin.
One more thing, about group classes in general- if you find one you like and start going regularly, you'll end up seeing the other "regulars" and it gets to become kind of a connection-sharing thing. You become friendly with the other members and get used to meeting up with them at class and that can be inspiring and fun to have a regular group of people to workout with. You never know who you'll meet- just sayin.
Friday 21 November 2014
Recovery Redefined: How Much Rest You Actually Need
 The reality of exercise is that you don’t make progress when you work
out— you make progress when you recover from the workout. The workout is
the stimulus, while recovery and improvement is the physical response.But what does recovery mean and what can you do to help yourself and
your clients
The reality of exercise is that you don’t make progress when you work
out— you make progress when you recover from the workout. The workout is
the stimulus, while recovery and improvement is the physical response.But what does recovery mean and what can you do to help yourself and
your clientsrecover from the physical demands of training? I will answer this question based on the insights I’ve gained through formal learning and my experiences as a 15-year, multiple award-winning fitness professional. Proper recovery is as important as proper training—and it is also often just as confusing as there are many strategies claiming to be the correct way to train and recover. There are rarely—if ever—any training or recovery strategies that will serve everyone universally. Manipulating the bigger concepts to fit a specific individual can take some trial and error, but it yields a more sophisticated understanding of what the body needs.
Rest Day Defined
To most of your clients, “rest” means absolute stillness. A period of stillness can be helpful for both body and mind, but stillness should not last an entire day. The one important factor to remember about recovery is that it is largely about tissue regeneration and nutrient delivery. Exercise creates a physical stimulus for the body to get better at the challenge with which it was presented and that can only happen if there is blood flow. Circulation brings nutrients to the tissues, nutrients provide the material to facilitate the improvement, and circulation is enhanced by movement.
Thus, a “rest” day is characterized by a need for some movement—not by being sedentary on the couch all day. Each day of the week should contain decent amounts of movement, while some days will also contain a challenging workout. Movement is a daily occurrence. A rest day is really any non-training day—a day where you remove the challenge of hard exercise. So it might even include some exercise-type activities, provided the intensity is manipulated to avoid providing a physical demand that is at or above current abilities.
How Much Is Enough?
How much recovery is enough is dependent on a wide range of individual variables, such as current physical abilities, sleep habits, dietary habits and lifestyle activity outside of exercise. An appropriate workout creates a sense of mild soreness, where you can feel that the muscles experienced a challenge; it should not be a debilitating, painful soreness that lasts for several days. That is a poorly designed workout. Many clients wrongly believe that a workout must be so hard that you should feel significant soreness for several days (unfortunately, many trainers mistakenly deliver this type of workout as well).
So how much recovery is enough? It’s when the soreness is gone from the muscle. A workout that is too hard and results in intense painful soreness, requires waiting until the soreness is gone to exercise again. So, if a client’s soreness lasts five days, then he or she should have five days before working out hard again. This is why it is important to train just above—but not far above—one’s current abilities: better fitness is not achieved by long gaps between training days. An appropriately challenging workout will, in general, require one to two recovery days.
If most of your clients' workouts consist of a consistent pattern of full-body training over time, then more frequent training may be possible because better, faster recovery is also likely going to occur in a well-trained individual. After all, a gardener or anyone who performs physical labor professionally does not work only on Monday, Wednesday and Friday.
How Can You Tell It’s Time to Have an Off-day?
Easy. When you really feel like one. This is your brain’s way of telling you that your body needs to rest. Ignore it at your own risk. Many fitness pros are obsessive about all high-intensity training, all the time, but this is a battle you are sure to lose. When your mind resists the idea of exercise, there is typically a reason. This is mostly true for consistent exercisers. For those new to exercise, it can take time for the body and mind to fully absorb the routine of regular exercise and there may be inaccurate mental signaling for an off-day. In this case, it is imperative to coach your clients on how to tell the difference between the mental pull of their former, stubborn, less-active selves and the brain’s signaling that the body needs a genuine break from the stress of exercise.
In general, even if you have manipulated the variables to allow for different workouts for several consecutive days, it is wise to allow a recovery day or lighter workout day at least every three to five days.
What is the Difference Between Rest and Recovery?
Rest is part of recovery. Recovery is everything that happens after the end of one workout and before the start of the next one. So rest includes sleep, time for stillness—both mental and physical—as well as participation in activities that provide mental and/or physical rejuvenation. This can include some Frisbee time, hitting some tennis balls, playing with your dog, etc. Rest can certainly include some movement as long as it avoids the threshold of providing a challenge to the body. Even lighter workouts can be useful as their main benefit will be to enhance circulation.
Check Out Isagenix Ionix Supreme Ionix Supreme is a nutrient-rich herbal tonic infused with natural vitamins, minerals and plant-based Adaptogens– perfect for combating the effects of stress and fatigue. Ionix is a powerful asset for building endurance and improving overall personal performance. Ionix Supreme
What Protein to you use to make sure you get the best you ?

For more information and to Buy IsaPro WHEY Protein go to: Link
Getting to the gym and putting in a high-intensity workout can be challenging. So when you set aside the time to hit the gym and work yourself to exhaustion, don’t you want to make it count?
According to a new study published in the Journal of the American College of Nutrition, what you eat before exercise can influence two vital hormones for muscle growth and recovery—testosterone and cortisol—and determine whether or not your workout pays off (1).
Researchers looked at the effects of supplementing with whey protein, soy protein, or carbohydrate in resistance-trained men. For two weeks at a time, the subjects ingested each of the fuel sources before performing a heavy bout of weight lifting. After completing each of the two-week protocols, the researchers compared the effects on testosterone and cortisol levels.
Exercise naturally can lead to higher levels of testosterone. But when compared to whey, soy protein supplementation resulted in significantly decreased levels of testosterone production for 30 minutes immediately following training. Soy protein even resulted in lower testosterone levels than when subjects supplemented with carbohydrate. This blunting of testosterone could lead to reduced gains in muscle and strength, meaning your hard work at the gym is a waste.
Additionally, whey protein supplementation resulted in significantly lower levels of cortisol for 30 minutes immediately following training. Whey’s effects probably had to do with its action on inducing a better insulin response. Although elevated cortisol levels following exercise are normal, a quicker insulin response and a decrease in circulating levels of cortisol can help lead to faster and more efficient recovery.
Testosterone and Cortisol for Optimal Performance
What does higher testosterone and lower cortisol following resistance training mean? More muscle building and faster recovery!
As one of the main anabolic hormones, testosterone plays a major role in both men and women in body composition. Research has shown that declining levels of testosterone are correlated with an increase in Body Mass Index (BMI) and fat mass (2). This is due to the role testosterone plays in increasing muscle mass and strength, as well as boosting bone density and strength.
Cortisol plays a wide range of roles in the body, but as a stress hormone, being highly elevated for longer periods of time could be damaging to health. In regards to exercise, cortisol naturally increases after physical activity and researchers continue to try to determine how much of a cortisol response can be considered neutral and not damaging to the body (3).
Beyond Hormones: Why Whey Wins
Whey’s superior effect over soy when combined with resistance exercise has a lot to do with amino acids. Even though both proteins are considered “complete” proteins, meaning they contain all essential amino acids, whey has a higher amount of branched chain amino acids (BCAAs). These include leucine, isoleucine, and valine, which are considered the most effective moderators of muscle growth and make whey an almost undisputed choice for attaining gains in muscle size and strength (4).
Why spend the time and dedication going to the gym and putting in the hard work if your protein source isn’t going to work just as hard for you? Don’t choose a protein that may even work against gains and recovery. Be sure to choose whey over soy.
Sources
- Kraemer WJ, Solomon-Hill G, Volk BM et al. The effects of soy and whey protein supplementation on acute hormonal reponses to resistance exercise in men. J Am Coll Nutr2013;32:66-74.
- Vermeulen A. Ageing, hormones, body composition, metabolic effects. World J Urol 2002;20:23-7.
- Gerber M, Brand S, Lindwall M et al. Concerns regarding hair cortisol as a biomarker of chronic stress in exercise and sport science. J Sports Sci Med 2012;11:571-81.
- Phillips SM. The science of muscle hypertrophy: making dietary protein count. Proc Nutr Soc2011;70:100-3.
Rope Climbs: Benefits, Technique, and Performance

To improve your rope climb, think about 3 things:
1. Shoulder strength- This is super vital for that body weight climb. Performing lifts such as overhead press, snatch, clean and jerk, and strict pull ups will help build the strength to climb the rope at speed.2. Fingertip pushups: This movement requires the hands, back, chest, and forearms to work together improving grip strength.
3. Time yourself climbing the rope: This will help increase power and dynamic strength for longer and more climbs.
If you have never tried to climb the rope, now is the time to learn! Let’s increase that pulling strength and get you up there!
Source http://pbcrossfit.com/article/lindsay-renteria
Thursday 20 November 2014
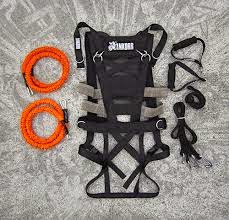
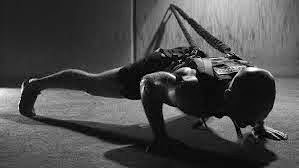
What is Ankorr

In doing so, Ankorr pioneers what we refer to as "fluid resistance". This is where we can simulate "game specific situations" for athletes & "field specific conditions" for soldiers. This prepares them both for operational readiness like never before.
The unique training arm that comes with Ankorr also sets it apart. "The ZUU" (www.thezuu.com.au) is a world class exercise platform based on primal pattern movements. Developed to increase strength endurance, mobility, strength through full ranges, anaerobic threshold, cardio vascular & character without the use of any equipment.
Combine a world class training program with a ground breaking functional tool & you'll understand why Ankorr is a "must have" in athletes, soldiers & coaches training kits.
Source | http://www.ankorr.com/
Ankorr Training
The unique Ankorr system allows an individual to either anchor to a
fixed point and work by themselves via resistance bands or team up with a
partner who can provide the resistance using bands/straps with handles
provided. Working the upper and lower body using dynamic bodyweight
exercises designed by The ZUU
Wednesday 19 November 2014
What Is a Foam Roller, How Do I Use It, and Why Does It Hurt?
Self-myofascial release, also known as “foam
rolling,” has transformed from a once mysterious technique used only by professional athletes, coaches, and therapists to a familiar everyday practice for people at all levels of fitness. Recent information, technology, and affordable products have introduced an increasing array of training and recovery methods to the average person.


Do I Have Tight Muscles or Trigger Points?
Trigger points are specific “knots” that form in muscles. They are unique and can be identified because they will refer pain. Pain referral, for our purposes, can most easily be described as the pain felt when pressure is applied to one area of the body, but the pain is felt or radiated in another area.
A common example of a trigger point is felt while foam rolling your iliotibial (IT) band as it causes pain to radiate up to the hip or all the way down the leg to the ankle. When rolling or working on tight/sore muscles you will experience discomfort or pain. Think of it like the pain you get while stretching. It should be uncomfortable, but not unbearable, and when you are done it should feel better.
Why Am I Doing Something That Hurts?
For many, deep tissue massage is easy to understand. Ideally someone is able to work out the knots in your muscles, and it is commonly known this process may be uncomfortable and at times painful. Self-myofascial release provides the user the ability to control the healing and recovery process by applying pressure in precise locations, because only you can feel exactly what is happening.
It is always recommended to consult with your physician or physical therapist for therapeutic/sharp pain and receive approval before starting self-myofascial release. For most people you will be cleared immediately and your doctor will encourage the practice.
Releasing trigger points helps to reestablish proper movement patterns and pain free movement, and ultimately, to enhance performance. Utilizing stretching alone is not always enough to release muscles tightness, which is why foam rollers have thrived on the mass market. Imagine a bungee cord with a knot tied into it and then envision stretching the cord. This creates tension, stretching the unknotted portion of the muscle and the attachment points. The knot, however, has remained unaltered.
Foam rolling can assist in breaking up these muscle knots, resuming normal blood flow and function. The goal to any corrective or recovery technique is to get you back to the point of normal functioning, as if nothing was ever wrong. When was the last time you trained like you were a teenager, going hard without a second thought, and injuries were something that only happened due to physical trauma like a 250lb linebacker hitting you?


Both have the same contributing factors including training, flexibility, movement patterns, posture, nutrition, hydration, rest, stress, and other lifestyle factors. Our bodies learn to compensate for what we throw at them every day, but we can exceed our ability to recover via too many intense workouts, poor posture, and other lifestyle factors.
This is when you need assistance using recovery techniques or through seeing a professional. If you lived a perfect life with everything in balance, you would theoretically never have either of these conditions, however I’ve yet to meet that person.
How Does Self-Myofascial Release Work?
Deep compression helps to break up or relax tight muscles and adhesions formed between muscle layers and their surroundings. Imagine you are tenderizing your own muscles. They should be soft and supple like a baby’s muscles. However, if our muscles are not taken care of properly we can experience loss of flexibility, adhesions, and painful movement.
The deep compression of self-myofascial release allows normal blood flow to return and the restoration of healthy tissue. The body naturally wants to be healthy and strong, but sometimes an extra boost is needed to achieve optimal muscle and tissue health.
How Do I Know What to Foam Roll and How to Do It?
Areas to focus on can be identified in two different ways. The first is through screenings. If you have followed the last two articles - squat screening and hip hinge screening - and have had struggles with either movement, you should include foam rolling in your workout and recovery program. You may target specific areas/muscles that relate to the movements you are focusing on.
If after using the foam roller your movement improves, you have a more specific strategy to follow. Secondly, trigger points and tight muscles can be found through self-exploration, utilizing the list of techniques below and exploring each one.
To foam roll properly, apply moderate pressure to a specific muscle or muscle group using the roller and your bodyweight. You should roll slowly, no more than one inch per second. When you find areas that are tight or painful, pause for several seconds and relax as much as possible. You should slowly start to feel the muscle releasing, and after 5-30 seconds the discomfort or pain should lessen.
If an area is too painful to apply direct pressure, shift the roller and apply pressure on the surrounding area and gradually work to loosen the entire area. The goal is to restore healthy muscles - it is not a pain tolerance test. You may also use other objects to work on muscles such as a tennis ball, lacrosse ball, Theracane, or Trigger Point Therapy Kit.


Never roll a joint or bone. Avoid rolling your lower back. To target these muscles I recommend using tennis or lacrosse balls. If you are having issues with your neck, refer these issues to an appropriate medical professional, as these areas they can be more sensitive and require more advanced attention.
What Happens After Foam Rolling?
You may be sore the next day. It should feel as if your muscles have been worked/released, however you should not push yourself to the point of excessive soreness. Drink plenty of water, get enough sleep, and eat clean. This will help to flush your system and fuel your muscles more effectively. Give it 24-48 hours before focusing on the same area again.


Source:
Jeff Kuhland - Corrective Exercise and Outdoor Fitness
Tuesday 18 November 2014
TRX Workout for beginners
This TRX workout is designed for beginners. One of the things I hear
most often when I talk about TRX, including in response to my TRX beginner tips, is that people want to try it, but aren’t sure what to do and don’t want to look silly . My goal with this workout is to introduce you to some basic moves
and give you something you can pull up on your phone at the gym so you
know what to do.
This workout is an interval workout, which is very common for TRX.
Each move is performed for 30 seconds. Move as quickly as you can from
one move to the next. They are staggered to focus on upper body, lower
body, and core so you shouldn’t need to rest in between (but of course,
if you do need a rest, take it). As you advance, feel free to increase
the interval. I typically do 30-60 second intervals depending on what
I’m doing. The exercises are split into two mini circuits and you’ll
repeat each circuit three times. Form notes for the exercise appear
below the graphic.

Form Notes:
Most of these notes reference the non-TRX version of the exercise (squat, lunge, plank, etc) and they assume you are familiar with the proper form for those exercises. If you are not familiar with the non-TRX version, please please please make sure you understand the proper form before you attempt the TRX versions.
- Chest press - For me, the easiest way to think about this move is to think of it as a push-up with your hands in the straps. Your elbows should come along your sides at roughly a 45 degree angle. The straps should be outside your arms. Keep your wrists straight.
- Squat - The form here is almost identical to a normal squat but your weight is further in your heels since you have the TRX for support. Make sure you are using your legs, not pulling with your arms.
- Rows - Keep your wrists straight. When your arms are extended, your palms should be facing the ground. As you pull your bodyweight up, rotate your hands so that at the top of the movement, your palms are facing inward. Keep your elbows in so they are shaving along your ribs.
- Plank - This is just like a normal forearm plank, but your feet are in the straps. If you’re anchored to a wall, make sure your feet aren’t touching the wall (that’s cheating).
- Reverse lunges - Again, this is similar to a reverse lunge. However, you aren’t really stepping back on your back leg, you are floating it back. When you first start, tap your back toe to the ground as lightly as possible. Work up to the full version where you hover the back leg without touching the ground. Remember to use your legs, the straps are just for balance. Do 30 seconds on your right leg first, then switch to your left.
- Bicep curls - Hold the straps with your arms extended out in front of you, palms up. As you perform the bicep curl, keep the 90 degree angle between your upper arms and your torso (this is harder than it sounds). Control the movement as you lower back down, don’t just drop.
- Hamstring curls - With your heels in the straps and your toes pressing against the handles, press up into a reverse plank with your shoulders on the ground. Your body should be in one long line from your shoulders, through your hips and legs, to your feet. From this position, pull your heels in towards your butt without changing the position of your torso.
- Tricep press - Face away from the anchor point holding the straps above your head and your palms facing forward. The motion is similar to a normal overhead tricep press. Keep your elbows just at the edge of your peripheral vision. Your upper arms should not be moving, your elbows should be anchored in place, the only motion should be your forearms
- Knee tucks - Start in plank position, top of a push-up, shoulders over wrists, feet in the loops. Pull your knees in toward your chest, return to start, repeat.
Monday 17 November 2014
How to Perform 4 Kettlebell Exercises: An Illustrated Guide
You may have seen more and more people at the gym swinging what looks
like a cannonball with a handle. Those weird looking weights are called
kettlebells and they’ve been used by Russian strongmen for over two
centuries to “become strong like bull.” If you’re ready to experience
one of the most versatile pieces of training equipment known to man and
get the workout of your life, read on.
Russian strongmen weren’t the only ones who made use of the kettlebell. The Soviet army also incorporated kettlebells into their strength and conditioning programs. Every Soviet military unit had a gym called the “courage corner” where kettlebell snatches and swings were performed. The strength and conditioning that Soviet soldiers developed through the use of the kettlebell made them the envy of other countries. Lt. Gen. Giffard Martel, a commander in the British army during WWII, noted that “the rank and file of the Red Army was magnificent from a physical point of view. Much of the equipment we [British soldiers] carry on vehicles accompanying the infantry is carried on a man’s back in Russia.”

While American strongmen have trained with the kettlebell since the
late 19th century, it wasn’t until fairly recently that they achieved
mainstream use. Former Soviet fitness instructor Pavel Tsatsouline and
his book Enter the Kettlebell has
played an important role in bringing the kettlebell to the masses in
the United States. Thanks to Pavel and others like him, the kettlebell
has become a staple in gyms across America.
What makes the kettlebell especially useful is that it can impart all these benefits and work the whole body and yet is small enough for any man to store and use no matter if he’s living in a house, apartment, or dorm room (just watch out for your roommate’s head when you’re swinging it around!).
If you’re ready to harness your inner Russian strongman, read on. Below, Mr. Know Your Lifts showcases four basic exercises that you can perform with a kettlebell.
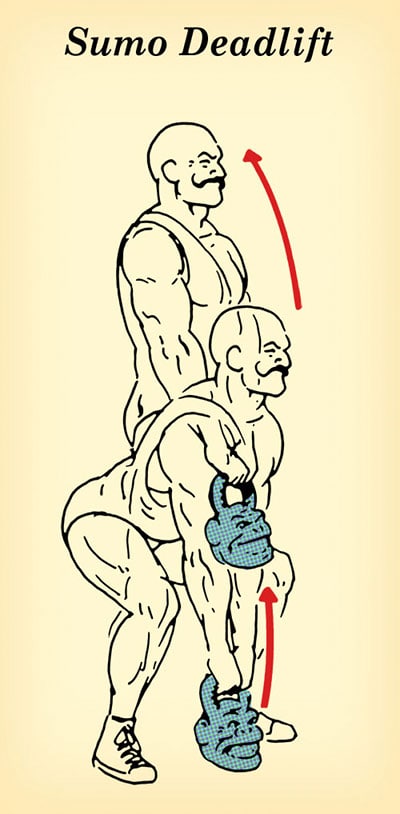
The sumo deadlift is great for loosening up the old hip flexors as well as strengthening the quads and the abductor muscles. It’s also a good lift to master first as it lays the foundation for many other kettlebell lifts and swings.
Stand over your kettlebell with your feet slightly wider than shoulder-width apart. Have your feet turned out just a bit. Sit back as if you were going to sit in a chair or take a crap in the woods. Keep your heels firmly planted on the ground. No tippy toes. Pick up the kettlebell with both hands, making sure to keep your arms straight. Your shoulders shouldn’t be ahead of your knees. Keeping your back and arms straight, lift the kettlebell off the ground with your legs until you’re standing straight up. Do not bend your arms as you stand, and do not lift with your back. When you’re in the standing position, your body should form a straight line. Lower the kettlebell back to the ground. Repeat ten to twenty times.
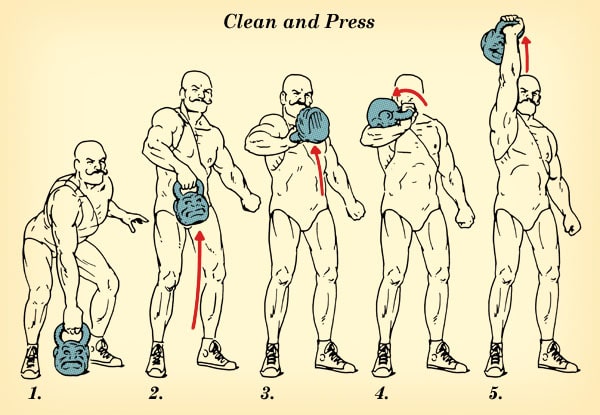
The clean and press is a full-body movement. You’re definitely going to be sore all over the next day after performing a few sets of these.
Straddle the kettlebell with your feet a little wider than shoulder-width apart and slightly pointed out. Squat down and grasp the kettlebell’s handle with one hand in an overhand grip. Position your shoulder over the kettlebell while keeping your back straight and looking forward (Fig. 1).
The following is done in one motion. Inhale and pull kettlebell up off the floor by bringing your hips forward. Once kettlebell is off the ground, vigourously pull it up with your shoulder, allowing your elbow to bend out to your side. Imagine you’re pulling the starter cord on a lawnmower. Keep the kettlebell as close to your body as you can (Fig. 2).
When the kettlebell reaches about chest level, rotate your elbow under the bell (Fig. 3). Catch the kettlebell on the outside of your arm; wrist is straight and knees are slightly bent. The bell will end up between your forearm and bicep (Fig. 4). This is called the “rack position.” Exhale. Some folks (like me) like to do a full-on front squat instead of slightly bending their knees. I prefer this method because it gives my quads a nice workout.
Inhale and explosively press the kettlebell off your arm and straight up to lockout over your head. Exhale when you reach lockout (Fig. 5).
Lower the kettlebell back to the rack position. Slowly lower the kettlebell to the ground between your legs while squatting down, keeping your back straight, and your head looking forward. Repeat.
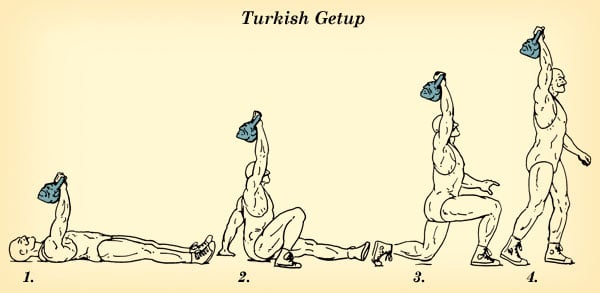
The Turkish getup looks easy, but — holy smokes — it’s a killer exercise. It works your entire body — hips, legs, core, shoulders, forearms — and aids in stability and balance. I highly recommend you start off with a lighter kettlebell when you first start doing the Turkish getup. I could barely eek out 5 reps with a 26-pound kettlebell the first time I performed it.
Turkish Getup keys: keep the arm that’s holding the kettlebell straight and your eyes on the weight during the entire lift. Take it slow and be deliberate with your movements.
1. Hold the kettlebell in your right hand and fully extend your right arm above you so that you’re holding the kettlebell above your chest. Your shoulder should be tight in the socket. To achieve this, think about “packing” your shoulder/shoulder blade down and back. Your lat should be touching the ground (Fig. 1).
2. Bend your right leg at your knee so that your right heel is back near your butt. Keep your left leg straight. Place your left arm out to the side, with your palm face down on the ground. Keep your right arm fully extended above your head and your eyes on the kettlebell.
3. Begin to lift your right shoulder off the ground and come up and rest on your left elbow. Remember, keep the kettlebell above you. Right arm is still fully extended. Keep your chest up and out.
4. Transition from your left elbow to your left hand. Focus on keeping that right arm fully extended. Continue that good posture by keeping the chest up and out (Fig. 2).
5. Drive your hips upward and squeeze those glutes. You should now be in a bridge position with just your left hand and both feet on the ground. Your right arm is still fully extended and your eyes are on the weight.
6. Sweep your extended left leg back behind your body so that your left knee is on the ground. You should be in a lunging position. Torso should be erect. Keep that right arm extended! (Fig. 3).
7. Now just stand up. It’s the same movement as if you were rising from a lunge. Again, keep your right arm straight (Fig. 4).
Congratulations! You just completed one repetition of a Turkish Getup. Now it’s time to follow the steps above in reverse and return to the starting position on your back. Go for 5 to 10 reps. Switch sides and perform the lift on your left side.
Source This post is brought to you by Onnit.
The History of the Kettlebell
Kettlebells have been a staple in Russian exercise and physical culture since the 1700s. In fact, any old-time strongman or weightlifter in Russia was called a Girevik, or “kettlebell man.” The most famous Girevik was a bear of a man named Pyotr Kryloff. Called the “King of Kettlebells” Kryloff was a circus and strongman performer during the late 19th and early 20th centuries. According to Pavel Tsatsouline in his book Enter the Kettlebell, Kryloff “could cross himself in the Russian Orthodox manner with a 70-pound kettlebell, military press the same kettlebell with one arm 88 times, and juggle three of them at once!”Russian strongmen weren’t the only ones who made use of the kettlebell. The Soviet army also incorporated kettlebells into their strength and conditioning programs. Every Soviet military unit had a gym called the “courage corner” where kettlebell snatches and swings were performed. The strength and conditioning that Soviet soldiers developed through the use of the kettlebell made them the envy of other countries. Lt. Gen. Giffard Martel, a commander in the British army during WWII, noted that “the rank and file of the Red Army was magnificent from a physical point of view. Much of the equipment we [British soldiers] carry on vehicles accompanying the infantry is carried on a man’s back in Russia.”
AoM reader and Orthodox priest Father John A. Peck continues the tradition of Eastern strength training.
Benefits of Kettlebell Training
Kettlebell training is extremely dynamic. When you kettlebell train, you’re not only getting a strength training workout, but you’re also getting some high-intensity conditioning (great for increasing testosterone!). In addition to getting your muscles jacked and your heart pumping, kettlebell training also increases power and explosiveness, particularly in the hips. Consequently, many powerlifters are incorporating kettlebells into their training to help with the hip explosion necessary to properly perform and maximize the deadlift and the squat. Finally, kettlebell training increases flexibility and range of motion.What makes the kettlebell especially useful is that it can impart all these benefits and work the whole body and yet is small enough for any man to store and use no matter if he’s living in a house, apartment, or dorm room (just watch out for your roommate’s head when you’re swinging it around!).
If you’re ready to harness your inner Russian strongman, read on. Below, Mr. Know Your Lifts showcases four basic exercises that you can perform with a kettlebell.
Sumo Deadlift
The sumo deadlift is great for loosening up the old hip flexors as well as strengthening the quads and the abductor muscles. It’s also a good lift to master first as it lays the foundation for many other kettlebell lifts and swings.
Stand over your kettlebell with your feet slightly wider than shoulder-width apart. Have your feet turned out just a bit. Sit back as if you were going to sit in a chair or take a crap in the woods. Keep your heels firmly planted on the ground. No tippy toes. Pick up the kettlebell with both hands, making sure to keep your arms straight. Your shoulders shouldn’t be ahead of your knees. Keeping your back and arms straight, lift the kettlebell off the ground with your legs until you’re standing straight up. Do not bend your arms as you stand, and do not lift with your back. When you’re in the standing position, your body should form a straight line. Lower the kettlebell back to the ground. Repeat ten to twenty times.
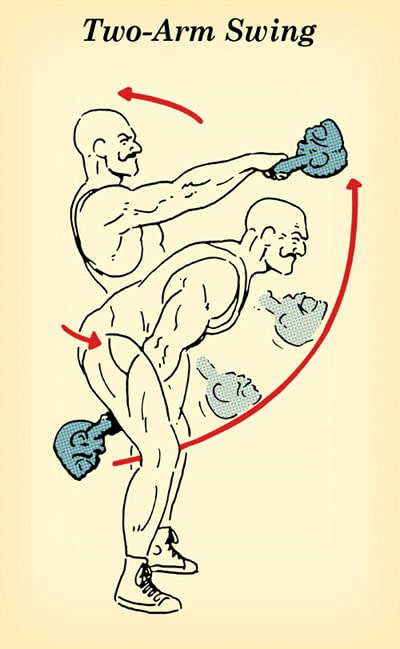
Two-Arm Swing
The two-arm swing is a staple of kettlebell
training. It’s definitely a full-body exercise, but you’ll especially
feel it in your hips, quads, and shoulders. It’s a
great auxiliary exercise to increase the hip explosiveness necessary for
the deadlift and squat.
Stand above your kettlebell with your feet
shoulder-width apart and the bell between your heels. Lower your hips as
if you were going to sit down in a chair and grab the kettlebell with
both hands. Arms should be straight; shoulders behind knees; back
straight. Make sure your weight is on your heels — not your toes.
Basically you’re doing the starting position of a sumo squat.
Pop your hips forward to get the kettlebell
to swing out in front of you a bit. To give you an idea of the motion
I’m talking about, you basically want to “hump” the air in front of you
(credit goes to my high school football coach for this phraseology).
Let the kettlebell swing back behind your
butt like you were snapping a football to a quarterback. When the bell
is by your butt, explosively drive your hips forward (hump that air!)
and swing the kettlebell up to about chest level. Keep your arms
straight and relaxed during the swing up. When the kettlebell reaches
chest-level, let your arms swing back down so that the kettlebell goes
back to your butt. Drive your hips forward for another swing.
Repeat. Make sure you keep your head up and back straight during your
swings.
You can swing for time or for reps. Personally, I like sets of twenty.
Clean and Press
The clean and press is a full-body movement. You’re definitely going to be sore all over the next day after performing a few sets of these.
Straddle the kettlebell with your feet a little wider than shoulder-width apart and slightly pointed out. Squat down and grasp the kettlebell’s handle with one hand in an overhand grip. Position your shoulder over the kettlebell while keeping your back straight and looking forward (Fig. 1).
The following is done in one motion. Inhale and pull kettlebell up off the floor by bringing your hips forward. Once kettlebell is off the ground, vigourously pull it up with your shoulder, allowing your elbow to bend out to your side. Imagine you’re pulling the starter cord on a lawnmower. Keep the kettlebell as close to your body as you can (Fig. 2).
When the kettlebell reaches about chest level, rotate your elbow under the bell (Fig. 3). Catch the kettlebell on the outside of your arm; wrist is straight and knees are slightly bent. The bell will end up between your forearm and bicep (Fig. 4). This is called the “rack position.” Exhale. Some folks (like me) like to do a full-on front squat instead of slightly bending their knees. I prefer this method because it gives my quads a nice workout.
Inhale and explosively press the kettlebell off your arm and straight up to lockout over your head. Exhale when you reach lockout (Fig. 5).
Lower the kettlebell back to the rack position. Slowly lower the kettlebell to the ground between your legs while squatting down, keeping your back straight, and your head looking forward. Repeat.
Turkish Getup
The Turkish getup looks easy, but — holy smokes — it’s a killer exercise. It works your entire body — hips, legs, core, shoulders, forearms — and aids in stability and balance. I highly recommend you start off with a lighter kettlebell when you first start doing the Turkish getup. I could barely eek out 5 reps with a 26-pound kettlebell the first time I performed it.
Turkish Getup keys: keep the arm that’s holding the kettlebell straight and your eyes on the weight during the entire lift. Take it slow and be deliberate with your movements.
1. Hold the kettlebell in your right hand and fully extend your right arm above you so that you’re holding the kettlebell above your chest. Your shoulder should be tight in the socket. To achieve this, think about “packing” your shoulder/shoulder blade down and back. Your lat should be touching the ground (Fig. 1).
2. Bend your right leg at your knee so that your right heel is back near your butt. Keep your left leg straight. Place your left arm out to the side, with your palm face down on the ground. Keep your right arm fully extended above your head and your eyes on the kettlebell.
3. Begin to lift your right shoulder off the ground and come up and rest on your left elbow. Remember, keep the kettlebell above you. Right arm is still fully extended. Keep your chest up and out.
4. Transition from your left elbow to your left hand. Focus on keeping that right arm fully extended. Continue that good posture by keeping the chest up and out (Fig. 2).
5. Drive your hips upward and squeeze those glutes. You should now be in a bridge position with just your left hand and both feet on the ground. Your right arm is still fully extended and your eyes are on the weight.
6. Sweep your extended left leg back behind your body so that your left knee is on the ground. You should be in a lunging position. Torso should be erect. Keep that right arm extended! (Fig. 3).
7. Now just stand up. It’s the same movement as if you were rising from a lunge. Again, keep your right arm straight (Fig. 4).
Congratulations! You just completed one repetition of a Turkish Getup. Now it’s time to follow the steps above in reverse and return to the starting position on your back. Go for 5 to 10 reps. Switch sides and perform the lift on your left side.
Source This post is brought to you by Onnit.
Subscribe to:
Posts (Atom)